8.2 KiB
Tooling setup
- Install brew packages
- Install flatpak packages
- Secret management
- Restore ssh keys and dotfiles
- Optional configuration
This guide will walk through how I setup fresh installations of Bluefin. For end users Bluefin provides a system as reliable as a Chromebook with near-zero maintainance, with the power of homebrew, flathub, and a container runtime to give you access to all the best software Open Source has to offer.
I use Bluefin as my daily driver operating system on a variety of different machines. The intent of this guide is to make it easy for me to get back up and running quickly whenver I do a fresh installation.
Install brew packages
Additional packages are ideally sourced from Homebrew for Linux, with Flathub for anything I can't find in brew. Included in this repository is my Brewfile of packages.
brew bundle install --cleanupInstall flatpak packages
For anything I can't get through Homebrew for Linux I install via Flathub. Included in this repository is my Flatfile of packages. Unfortunately the flatpak cli does not yet support list based installs so below is a bash oneliner to get the job done.
while read line; do flatpak install --assumeyes `echo $line | awk '{print $2}'`; done < FlatfileSecret management
For managing secrets we use bitwarden which provides a great cli utility. Additionally in our bashrc file included in this repository there are a number of helper functions to make working with bw easier.
The bw utility should already be installed as part of our homebrew packages. Let's login now.
bw login mail@jamesblair.netRestore ssh keys and dotfiles
I make extensive use of .dotfiles to further customise my environment. The script below restores my versions of key dotfiles automatically.
Obtain ssh key from bitwarden
In order to be able to clone the repository in the next step we need to obtain our ssh keys from bitwarden. Given we have installed the bitwarden cli we can mostly automte this process minus the initial login to bitwarden.
# Ensure we have an ssh-agent running
eval `ssh-agent`

# Generate a new blank key to overwrite
ssh-keygen -t rsa -f ~/.ssh/james -q -P ""

# Ensure we have an active bitwarden session
export BW_SESSION=$(bw unlock --raw > ~/.bw_session && cat ~/.bw_session)

# Export both keys
export key=$(bw get item "$(hostname)" --pretty | grep notes)

# Extract private key
export private=${key:12}
export private=${private/END RSA*/END RSA PRIVATE KEY-----}
echo $private | awk '{gsub(/\\n/,"\n")}1' > ~/.ssh/james

# Extract public key
export public=${key/*ssh-rsa/ssh-rsa} && echo ${public::-2} | awk '{gsub(/\\n/,"\n")}1' > ~/.ssh/james.pub
Clone and restore dotfiles
Once our keys are available to us we can clone down our dotfiles and get back to our comfortable normal terminal environment.
# Clone down this repository
git clone https://jmhbnz@gitea.jamma.life/jmhbnz/tooling.git ~/Documents/tooling/

# Restore all dotfiles
cp ~/Documents/tooling/.* ~/

# Reload bashrc with updated version
source ~/.bashrc
Optional configuration
Optional - Cloud provider tools
For working with google cloud platform we use the GCP SDK, which provides our cli tools. Unfortunately we can't install it via brew on Linux so we need to install it manually.
# Download the sdk archive
curl -o gcpsdk.tar -O https://dl.google.com/dl/cloudsdk/channels/rapid/downloads/google-cloud-cli-linux-x86_64.tar.gz

# Extract to a folder in path then remove archive
mkdir /home/${USER}/.var/bin && tar xvf gcpsdk.tar -C /home/${USER}/.var/bin && rm gcpsdk.tar

# Run the install script
/home/${USER}/.var/bin/google-cloud-sdk/install.sh
Optional - Setup doom emacs
An integral part of my development workflow is Doom Emacs. Below are the instructions to set this up.
# Install doom emacs
git clone --depth 1 https://github.com/doomemacs/doomemacs ~/.config/emacs
~/.config/emacs/bin/doom install

# Copy in my configuration
cp /home/${USER}/Documents/doom/* /home/${USER}/.config/doom/

# Doom sync to finalise
doom sync
Included in this repository is a doom/ subdirectory which layers my personal preferences on top of doom.
Optional - setup tmux plugin manager
For terminal efficiency I use the tmux terminal multiplexer, however to customize it further I use the tpm plugin manager.
#+NAME Install tmux plugin manager
# Install tmux plugin manager
mkdir --parents /home/${USER}/.tmux/plugins
git clone https://github.com/tmux-plugins/tpm /home/${USER}/.tmux/plugins/tpm
./home/${USER}/.tmux/plugins/tpm/bin/install_plugins

# Source the tmux configuration file
tmux source ~/.tmux.conf
Optional - Setup sbp powerline prompt
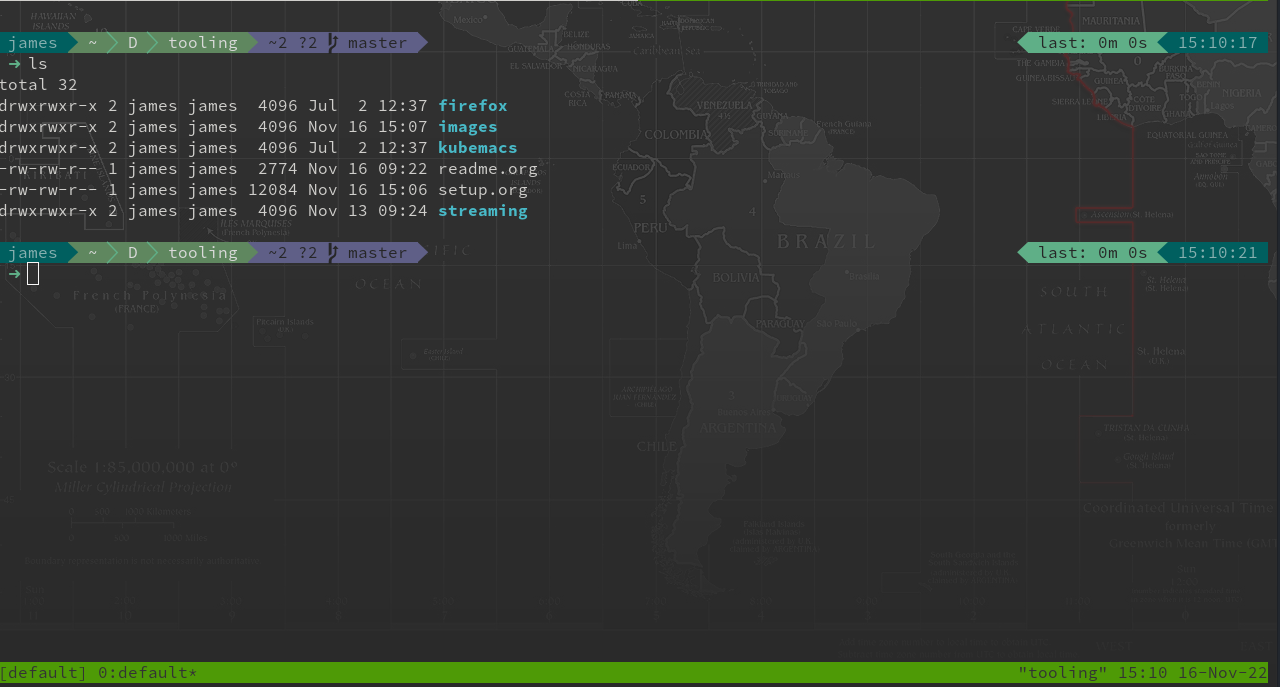
Having an informative bash prompt can ease cognitive burden and make development more pleasant. Below is an example of my terminal prompt which is based on powerline fonts for symbols and simple bash prompt for the overall presentation.
As you can see in the screenshot, contextual "segments" are presented in the prompt to provide information like directory, current user and detailed git status.
# Disable bluefin/aurora terminal motd
ujust toggle-user-motd

# Clone the repository
git clone https://github.com/brujoand/sbp ~/Downloads/sbp/

# Run the install script
/home/$USER/Downloads/sbp/bin/install

# Ensure config directory exists
mkdir --parents /home/$USER/.config/sbp/

# Write the config file
cat << EOF > /home/$USER/.config/sbp/settings.conf
#!/usr/bin/env bash
SBP_THEME_COLOR='apathy'
SBP_THEME_LAYOUT='powerline'

# Hooks will run once before every prompt
# Run 'sbp list hooks' to list all available hooks
SBP_HOOKS=('alert')

# Segments are generated before each prompt and can
# be added, removed and reordered
# Run 'sbp list segments' to list all available segments
# Maybe you don't want to run all segments when in
# a small window?

if [[ "$COLUMNS" -le 120 ]]; then
  # Let's adjust to the smaller screen
  SBP_THEME_LAYOUT='powerline'
  SBP_SEGMENTS_LEFT=('path' 'python_env' 'git' 'command')
else
  SBP_SEGMENTS_LEFT=('host' 'path' 'python_env' 'k8s' 'git' 'nix')
  SBP_SEGMENTS_RIGHT=('command' 'timestamp')
  SBP_SEGMENTS_LINE_TWO=('prompt_ready')
fi

# Segment specific settings
SEGMENTS_K8S_DEFAULT_USER="$USER"
SEGMENTS_K8S_HIDE_CLUSTER=1
SEGMENTS_LOAD_THRESHOLD=50
SEGMENTS_LOAD_THRESHOLD_HIGH=80
SEGMENTS_RESCUETIME_REFRESH_RATE=600
SEGMENTS_TIMESTAMP_FORMAT="%H:%M:%S"
SEGMENTS_WTTR_LOCATION='Oslo'
SEGMENTS_WTTR_FORMAT='%p;%t;%w'
EOF

# Reload the prompt
sbp reload

# Disable the k8s segment (it's a bit too long when working with openshift)
sbp toggle peekaboo k8s
Congratulations - you should now have a functional, good looking and informative bash prompt! 🎉
Optional - bluetooth device names
On a fresh install a selection of bluetooth devices need to be paired. I prefer a custom naming scheme for these devices, so the snippet below can be used to bulk apply my preferred device names.
bluetoothctl connect CC:98:8B:B6:F0:8E && bluetoothctl set-alias james-headphones
bluetoothctl connect CA:20:FE:30:DA:C0 && bluetoothctl set-alias james-travel-mouse
bluetoothctl connect 80:E1:26:6D:66:4A && bluetoothctl set-alias james-flipper
bluetoothctl connect 88:C9:E8:5A:56:6C && bluetoothctl set-alias james-earphones
bluetoothctl connect E2:A0:9F:BC:DB:27 && bluetoothctl set-alias james-home-mouse